While circuit boards are the brains behind electronic devices, they unfortunately attract dust, grime, and even the occasional liquid spill. Fortunately, keeping them clean doesn't require a doctorate in electrical engineering. This guide will walk you through simple steps to restore your circuit board to its pristine state. Let's learn about how to clean a dirty circuit board.
Do Circuit Boards Need Cleaning
Yes, circuit boards can benefit from cleaning, especially in certain situations. Over time, circuit boards can accumulate dust, debris, residues from flux used during manufacturing, and other contaminants that could potentially cause electrical malfunctions or shorts. Cleaning circuit boards is essential in environments where cleanliness is critical, like in aerospace, medical devices, or other industries with stringent requirements.
Here are some common reasons for cleaning circuit boards:
-
Residues: Flux residues left behind during the manufacturing process can be conductive and lead to short circuits or malfunction.
-
Dust and Debris: Accumulated dust and debris can form a conductive path between components, causing electrical issues.
-
Corrosion Prevention: Moisture, salts, and other contaminants can cause corrosion on the board, leading to connectivity issues.
-
Enhanced Performance: Clean circuit boards can perform better, ensuring reliable operation.
-
Repair/Rework: When repairing or reworking a circuit board, cleaning might be necessary to ensure proper soldering and connections.
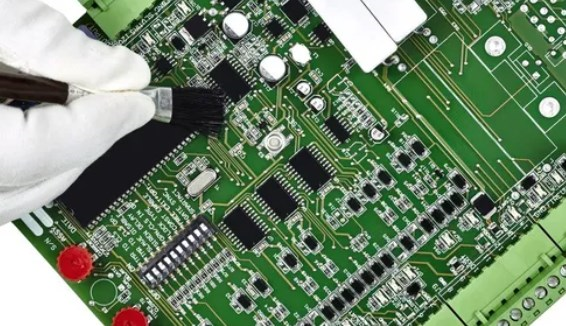
When cleaning circuit boards, it's important to use the appropriate methods and materials to avoid damaging the components. Using a specialized electronics cleaner, isopropyl alcohol, or a dedicated circuit board cleaner is recommended. Additionally, using a soft brush, compressed air, or lint-free wipes can help in gently removing dirt and contaminants.
It's essential to ensure that the board is completely dry before powering it back on to prevent any potential short circuits. If unsure about the cleaning process, it's advisable to consult with a professional or refer to the board's manufacturer guidelines.
How to Clean a Circuit Board in 5 Steps
Cleaning a circuit board requires care and precision to prevent damage to the components. Here is a general guideline on how to clean a circuit board effectively in five steps:
-
Preparation:
- Ensure that the circuit board is disconnected from any power sources.
- Wear appropriate personal protective equipment (PPE), such as gloves and safety glasses, to protect yourself from any potential hazards.
-
Assessment:
- Inspect the circuit board for visible dirt, dust, residues, or corrosion. Identify the areas that require cleaning.
-
Gather Supplies:
- Obtain the necessary cleaning supplies, such as:
- Isopropyl alcohol (preferably 90% or higher concentration)
- Soft-bristled brush (e.g., anti-static brush)
- Compressed air canister or air compressor
- Lint-free wipes or cotton swabs
- Non-conductive cleaning solution (optional)
- Obtain the necessary cleaning supplies, such as:
-
Cleaning Process:
a. Dry Cleaning:
- Use a soft-bristled brush or compressed air to remove loose dust and debris from the circuit board. Be gentle to avoid damaging components.
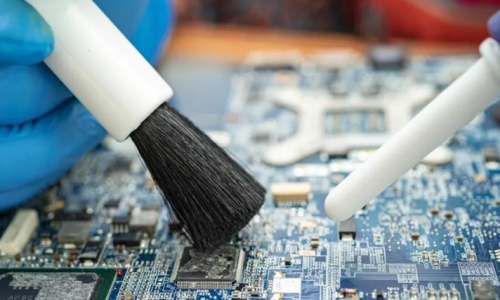
b. Wet Cleaning:
- Dip a lint-free cloth or cotton swab in isopropyl alcohol.
- Gently wipe the circuit board components to remove flux residues, dirt, or contaminants. Avoid excessive pressure to prevent component damage.
- If needed, use a soft brush or swab for detailed cleaning in hard-to-reach areas.
c. Rinsing (Optional):
- If using isopropyl alcohol, allow the board to air dry thoroughly. If necessary, rinse the board with distilled water to remove any remaining residue. Ensure the board is completely dry before reconnecting.
d. Drying:
- Allow the circuit board to air dry completely before reassembly or reinstallation. Ensure there is no residual moisture that could cause short circuits.
-
Final Checks:
- After the circuit board is dry, visually inspect it to ensure all contaminants have been removed.
- Reassemble the board, reconnect it to the power source, and test its functionality to ensure that cleaning has not caused any issues.
Remember, if you are uncertain about the cleaning process or concerned about damaging the circuit board, it is advisable to seek assistance from a professional electronics technician.
How Do I Know If My Circuit Board is Bad
etermining if a circuit board is faulty or malfunctioning can be challenging, but there are several signs and common symptoms that can indicate a problem. Here are some ways to identify if your circuit board is bad:
-
Visual Inspection:
- Check for physical damage, such as burnt components, discolored areas, bulging capacitors, or corrosion on the board.
- Look for loose connections, broken traces, or visible signs of wear and tear.
-
Smell:
- A burnt or unusual smell coming from the circuit board can indicate overheating or damaged components.
-
Functionality Issues:
- If the device powered by the circuit board is not functioning as expected or not working at all, it could be a sign of a faulty board.
- Check for intermittent issues, sudden shutdowns, or erratic behavior, which may point to problems with the board.
-
Electrical Testing:
- Use a multimeter to test for continuity, resistance, or voltage levels across components on the board. Deviations from expected readings could indicate a faulty component.
-
Diagnostic Tools:
- Some circuit boards come with diagnostic LEDs or error codes that can help pinpoint the issue.
- Utilize diagnostic tools or software provided by the manufacturer to identify specific faults on the board.
-
Overheating:
- If the circuit board feels excessively hot to the touch during normal operation, it could be a sign of a malfunctioning component or inadequate cooling.
-
Flickering Lights or Sparks:
- If there are flickering lights, sparks, or unusual noises coming from the circuit board, it could indicate a serious problem that needs immediate attention.
-
Data Loss or Corruption:
- Circuit boards in data storage devices, such as hard drives or memory cards, may exhibit symptoms like data loss or corruption if there are issues with the board.
-
Random Resetting:
- If the device powered by the circuit board resets randomly or experiences frequent power interruptions, it could be a sign of a faulty board.
If you suspect that your circuit board is faulty based on these signs, it is recommended to consult with a qualified technician or electronics specialist for further diagnosis and repair. They can conduct more in-depth testing and help you determine the best course of action to address the issue.
What Materials Can I Use to Clean a Circuit Board
When cleaning a circuit board, it's crucial to use materials that are safe for electronic components and effective at removing contaminants. Here are some common materials that are typically used to clean circuit boards:
-
Isopropyl Alcohol:
- Isopropyl alcohol, also known as IPA, is a widely used solvent for cleaning circuit boards. It effectively dissolves flux residues, dust, and other contaminants without leaving behind residue.
-
Distilled Water:
- Distilled water is often used in combination with other cleaning agents to rinse off contaminants after cleaning with solvents. It helps remove any remaining residues and should be allowed to dry completely.
-
Cleaning Brushes:
- Soft-bristled brushes, such as anti-static brushes, can be used to gently scrub and remove debris from the circuit board's surface. Avoid using abrasive brushes that can damage components.
-
Compressed Air:
- Compressed air canisters or air compressors are useful for blowing away loose dust and debris from the circuit board. It helps clean hard-to-reach areas without physical contact.
-
Lint-Free Wipes or Swabs:
- Lint-free wipes or cotton swabs are suitable for applying cleaning solutions like isopropyl alcohol to the board's surface. They help in wiping away contaminants without leaving lint or residue.
-
Non-conductive Cleaning Solutions:
- Some specialized non-conductive cleaning solutions are available for cleaning circuit boards. These solutions are formulated to be safe for electronic components and help in removing residues effectively.
-
Rubbing Alcohol (Ethanol):
- Rubbing alcohol, specifically ethanol-based solutions, can be an alternative to isopropyl alcohol for cleaning circuit boards. Ensure it is high purity and free from additional additives.
-
Electronics Cleaner Sprays:
- Dedicated electronics cleaner sprays are available in the market, designed specifically for cleaning circuit boards. These products can help remove stubborn residues and contaminants effectively.
When using cleaning materials on circuit boards, ensure that:
- The board is disconnected from any power source before cleaning.
- Allow the board to dry completely before applying power to prevent short circuits.
- Use materials and tools gently to avoid damaging components.
- Follow the manufacturer's guidelines if you are using specific cleaning agents recommended for the circuit board.
Suggestion of Cleaning a Circuit Board
Cleaning a circuit board can help maintain its performance and extend its lifespan. Here is a step-by-step guide on how to effectively clean a circuit board:
Materials Needed:
- Isopropyl alcohol (90% or higher concentration)
- Distilled water
- Soft-bristled brush or anti-static brush
- Lint-free wipes or cotton swabs
- Compressed air canister or air compressor
- Non-conductive cleaning solution (optional)
- Personal protective equipment (PPE) like gloves and safety glasses
Step-by-Step Cleaning Process:
-
Preparation:
- Disconnect the circuit board from any power source and remove it from the device if possible.
- Put on your personal protective equipment (PPE) to ensure safety during the cleaning process.
-
Dry Cleaning:
- Use a soft-bristled brush or compressed air canister to remove loose dust and debris from the circuit board. Direct the air in a sweeping motion to dislodge particles without damaging components.
-
Wet Cleaning:
- Dampen a lint-free wipe or cotton swab with isopropyl alcohol. Wipe the circuit board components gently to remove flux residues and stubborn contaminants.
- For hard-to-reach areas, use a soft brush dipped in isopropyl alcohol to scrub lightly.
-
Rinsing (Optional):
- If necessary, rinse the circuit board with distilled water to remove any remaining cleaning solution or residue. Ensure the board is completely dry before proceeding.
-
Final Cleaning:
- Use compressed air to blow-dry the board or allow it to air dry completely. Ensure there is no moisture left on the board before reassembly.
-
Final Inspection:
- Inspect the circuit board visually to ensure that all contaminants have been removed and there is no visible damage.
- Reassemble the board, reconnect it to the power source, and test its functionality to confirm that the cleaning process did not introduce any issues.
-
Proper Disposal:
- Dispose of any cleaning materials safely as per local regulations. Isopropyl alcohol and other solvents should be disposed of properly to protect the environment.
If you are unsure about the cleaning process or concerned about damaging the circuit board components, consider seeking assistance from a professional electronics technician. They can provide guidance and ensure that the cleaning is done effectively without risking component damage.